The scramble up Pika Peak was the most challenging, most engaging and most fun of the three mountains we summited on our trip.
I was a bit nervous about the approach. We would have to hike up above the lower cliffs of the mountain and then traverse across the steep, rubble-covered slopes to the col with Mount Richardson. I had been looking up at those slopes for the last few days, worrying about how we would be able to move safely across them.
But I knew we would be able to turn around and retreat if the approach seemed too unsafe. I knew others had done it. There is a photo on the Steven Song website (link below) that made it look ok. I was curious to see what it would be like. More curious than nervous.
Beta:
- This route is out and back. It is possible to combine this summit with Mount Richardson and/or Ptarmigan Peak. Check out Steven Song’s description of this three peak link-up (his website link is below).
- We started at the Hidden Lake campground. I created a post with information about permits, reservations and getting to the campground. Read it here: Hidden Lake Campground: Planning, Permits, and Hike In
- Elevation gain: about 750 meters from Hidden Lake
- Difficulty: Steep hiking on rock, scree and talus. Scrambling up steps and chimneys, some a couple body lengths high. Exposed hiking across ridge top to the summit.
- Gear: I had gaiters to keep scree out of my boots. We were glad we had helmets because there was some rock fall from the upper cliffs when we traversed below them.
Permit Required
A National Park Pass is needed to park at the trailhead. A permit is needed to camp. See the link to my post about obtaining a camping permit in the bullet point above.
Helpful App
- FATMAP
Website
- Steven Song – Pika Peak – He climbed all three peaks – PIka, Richardson and Ptarmigan – in one long day from the road!
Book
- Scrambles In the Canadian Rockies by Alan Kane
Trip Report
From the campground, we once again hiked to Hidden Lake.
When we arrived at the lake, a loon was gliding across the surface.
We crossed the outlet stream again and headed into the meadows.


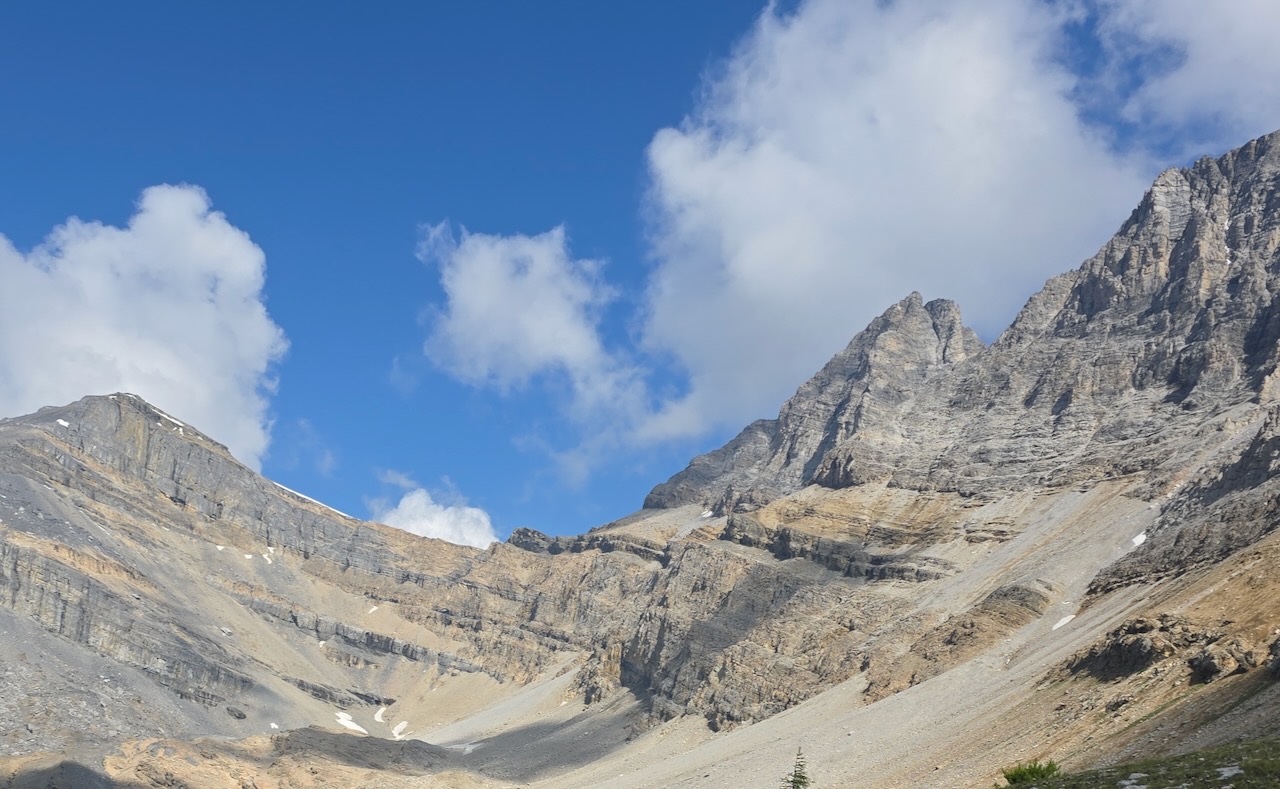
Our route from the day before, up Ptarmigan Peak went across the meadows to the scree slopes on the far right of the photo.
For Pika Peak, we hiked to the grassy slope in the middle of the photo, below the snowy gully.
The route goes up the gully and left across the slopes, below the upper cliffs, as shown by the black arrows below.

The route continues to the Richardson-Pika col and then climbs the upper cliffs to the summit.


As we got closer to the start of the route, the slope up to the snow gully looked pretty good.
It was still tough to see how we would move out left above the snow gully, across the rubbly slopes. I hoped that once we got closer, it would look more reasonable.
Near the top of the grassy slope, we could see the snow gully head on. The upper slopes on the left started to look a bit more possible.


We started hiking up the scree slopes toward the snow gully.
Mount Richardson is in the background.
Looking at the upper slopes from further up the scree slope. I still felt nervous about the traverse. How were we going to hike across that? I wasn’t even sure yet where the route would go.
(We ended up going high, just below the upper cliffs.)


At the top of the snow gully, it all became more clear. The slope below the upper cliffs looked good. A faint trail could be seen across the scree.

We started across. The traverse is about half a kilometer long to the col in the distance.
We found a faint trail and occassional cairns that helped guide us.


Here the route goes along the base of the cliffs where the ground is a little flatter and easier to walk.
The most challenging part of the traverse is ahead, on the other side of the snow. There it is steeper and the ground is hard.


Looking back, it is easier to see the trail across the slope. This made it a bit easier to find the best way across when we returned after summiting.
The route joins the col high up on the Pika Peak side. We stopped for a break at the base of the upper cliffs.
An obvious trail wound up around the left side.


I am coming up the start of the rocky section above the col.
Mount Richardson is in the background.
Looking up at the route ahead of us. The summit is not in sight.


I “strike a pose” as I come up over a scramble section. I enjoyed this section.
Coming up.


Contemplating the next moves.
Dan scrambles up a step.


And another step.
The rock here is solid and has lots of good holds.
Above the steps, a trail leads to the next scrambling section.


The route goes up the hill and through the rocks on the right side of the photo.
We mistakenly thought that the top of this section was the summit.
When we got to the top, we saw that the real summit was a short hike across a narrow, exposed ridge.


I started toward the summit first. Looking back, I could see Dan contemplating the best way over the top of the rock.
I am making my way across the ridge top to the summit – almost there!


A well-earned break on the summit. We rest and take in some nutrition, getting ready to descend the rock and “rewind the grind” across the traverse.
Dan heading down the rock section.


I focus on the down-climb.
Now heading down to the base of the rock section.


Dan descends toward the col.
Down on the lower slopes, we rewind the grind and hike down off the mountain.

We hiked past the beautiful Hidden Lake one last time and then on to camp. We picked up our backpacks and walked back to the road. It was a long day but so worthwhile!
Our trip to Hidden Lake was fun and successful. We camped in a beautiful setting and climbed three peaks in three days.
When we got home, we immediately booked another trip. Three nights at Aster Lake in Kananaskis in September and hopes for two or three more peaks.
Meanwhile, we’ll continue going for summits near home. If you would like to be notified when I publish my next trip report, please subscribe.

Reach the peak!
Read about our other summits: