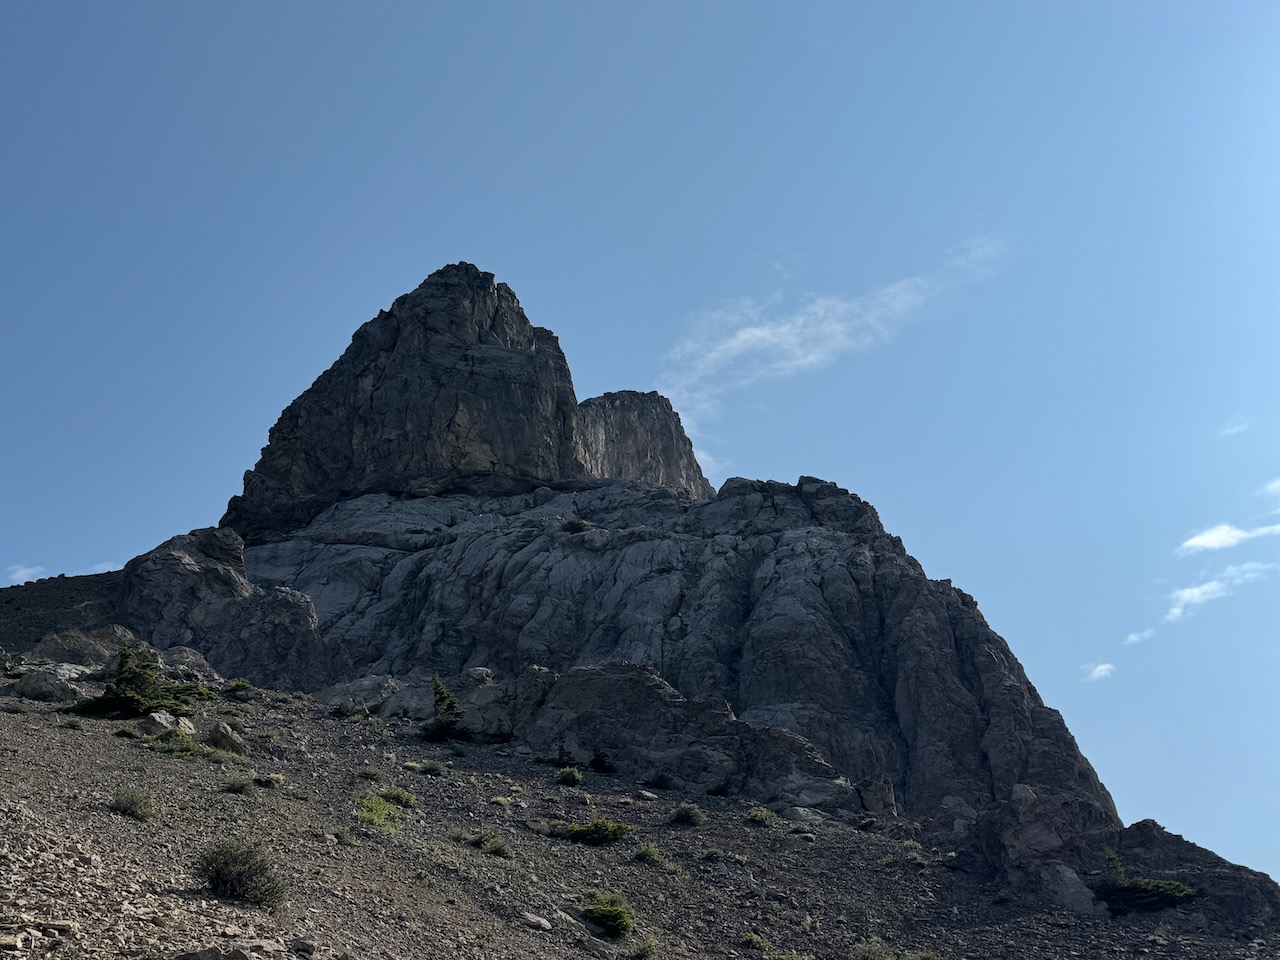
On June 17, 2025, we climbed BBQ’d Rib, a moderate trad route on the west end of Mount Yamnuska.

BBQ’d Rib climbs near the far left edge of the south face where it turns to meet the west face.
The route includes some slab climbing and some blocky, moderate face climbing. It is five pitches and about 140 meters.
There are some bolts along the route and it can be described as a “mixed” route. However, there are not enough bolts to adequately protect the route and trad gear placements are required.

The beautiful, steep south face of Mount Yamnuska has many trad climbing routes. A multi-pitch on Mount Yamnuska feels to me like a right of passage for climbing in the Canadian Rockies.
Although Dan and I were eager to try a route there, we took our time learning about the climbing, practicing our multi-pitch skills and becoming competent with trad climbing skills before attempting a climb there.
We picked up a copy of Andy Genereux’s book “Rock Climbs of Mt. Yamnuska”. We chose BBQ’d Rib as our first route because of the easier grade and the short length – only 5 pitches. Also, there are bolts at the anchors and clearly defined belays which helped us manage the route and save time building anchors.
It seemed like a good first small bite. Andy’s book says that this climb is probably the best of the three “entry level routes” on the west end of the mountain. It did not disappoint.
Beta Summary:
- 5.6, 5 pitches – each roughly 25 meters.
- Approach: 580 meters elevation gain and 3.9 km for the trail we took. There are a couple of options, see below.
- Pro: some bolts but primarily gear.
- Anchors: some are bolted, some are a single bolt backed up with gear or a natural feature.
- Gear: we used cams only, no nuts. We could have gotten by with one set of cams, maybe doubling the micro cams, because we did not combine any of the pitches.
- Ropes: We used one 70 meter rope.
- Descent: A walk-off with some scrambling to get off the BBQ Ledge.
Planning
As mentioned above, Andy Genereux wrote a guide book, “Rock Climbs of Mt. Yamnuska” that includes a full description of the route as well as colour photos with the route marked. We bought our copy at Vertical Addiction in Canmore. You can order it online here “Rock Climbs of Mt. Yamnuska“.
There is also a great description of the route, pitch by pitch, on the TABVAR website. Download it here “BBQ’d Rib“.
Time Budget
When Dan and I are doing full day climbs, I like to estimate how much time each segment of the day will take us. Then I track our progress against the budget to see if it was realistic. This helps me know for the future how long it takes us to move over different terrain. Also, if things go sideways (for example, we get off route or delayed), I know if we will have enough time to complete our objective.
To create the budget, I use a framework posted on Facebook by legendary mountain guide and route-builder, Mark Klassen. He wrote, “A fastish average pace is
- one hour for every 4km horizontal
- plus one hour for every 400m elevation gain in non-roped or glacier walking terrain,
- less 10-15% for descending.
- Pitching is 20-60 mins per pitch depending on difficulty, looseness, protection/anchor availability.
- Raps 10-60 mins, same issues in play.
- Add 20-60 mins per screw up, expect one per day. Add one screw up per lack of star: no stars = 3 screw ups. I have found the best way to move fast in the mountains is to reduce screw ups and when they do happen fix them as fast as possible!”
Using this framework, I estimated our time for the approach as 1 hour for the 4 km distance plus 1.5 hours for the nearly 600 meters of height gain. I added half an hour for getting geared up and eating half a sandwich. This gave us 3 hours.
I decided to budget one hour per pitch. It’s a lot of time but this route was new to us and I wasn’t sure how obvious the route would be. Also, it involved placing trad gear and we’re still pretty new at that. I don’t always choose the right piece on my first try. Sometimes I try two or three different pieces of gear before I find one I’m satisfied with. So I wanted to budget lots of time and not feel rushed.
The big blank spot in planning this day was the descent from the top of the climb to the hiker’s trail. I read in Andy’s book that the climb ends at a huge sweeping platform called BBQ Ledge. From this ledge, you step down onto slab, traversing to the climber’s left and eventually reaching scree slopes on the north side. I wasn’t sure how long this would take so I budgeted one hour.
The descent trail would be a straightforward hike back to the parking lot. I budgeted one hour.
Total budget = 10 hours. We started at 7:30 am and expected to be back at our van by 5:30 pm. Here’s how it went down:
Approach
Many of the climbs on Mt Yamnuska are approached using a designated climber’s trail that climbs the front, south side and traverses along the bottom of the cliff face. There is also a well-developed hiking trail that connects to the scramble route which traverses the top of the mountain on the back, north side.
It is possible to use the hiking trail that climbs to the west col (scramblers’ descent trail) to access the bottom of BBQ’d Rib. It may be a bit further and less direct than the climber’s approach but it has broad switchbacks and even stone stairways on steeper parts making it easier and more pleasant. Especially on a hot day, this forest trail is shady and cool.
Having hiked both the west col trail and the climber’s approach, we opted for the easier but slightly longer west col hiking trail. Our route is the bright red line on the map below, created using the GaiaGPS app on my phone.

Signing In

The hike starts here, at the edge of the parking lot.
Not far up the trail, a sign provides a list of potential backcountry hazards. To the right of the sign is the climbers’ sign in book inside a wooden case on a pedestal.

The climbers’ sign in page shows you if the route you are intending to climb is already occupied. Given all the loose rock on Mt Yamnuska, you would not want to climb underneath another party and risk them dropping rocks on you. You also wouldn’t want someone starting up underneath you and worry about dropping rocks on them. Only one party can climb a route at a time.
Checking the sign in sheet saves you hiking all the way up to the base of your route only to find it occupied. When you sign in, you make sure nobody else will come up to the route behind you.

Here we could see that we were the third party that day climbing on Mt Yamnuska. No one else was climbing BBQ’d Rib so it was all ours.
The Hiking Trail
After about 15 minutes of walking, we came to a set of stone stairs with a sign at the top.


The sign is at a T-intersection. Going right leads up the hiking trail to Raven’s End on the east side of Mt Yamnuska. That is where the scramble starts.
For BBQ’d Rib, you turn left onto the trail marked Climbers Access Only. Even if you are doing the west col hiking trail, you turn left here.
After a minute or two, we came to the turn off for Yamnuska Bluffs. This area is sometimes used by mountain guides for beginner groups and rock rescue courses. We continued up the trail marked Climbers Access Only.


We followed the very pleasant trail through the forest, heading towards the mighty south face.
About 15 minutes after passing the Yamnuska Bluffs sign, we came to the decision point. Here the path on the right, complete with “danger” sign to discourage casual hikers, leads up to the south face and the climbing routes. The lower path heading off left is the hiking trail to the west col. We chose the hiking trail to the west col.


After another 20 minutes of hiking, we looked up the scree slopes to the west end, towards our route.
Stone stairways like this one made the hiking feel easier.


Although they didn’t make our packs feel any lighter.
Beyond the Hiking Trail
Nearly 2 hours after leaving the parking lot, we looked across steep scree slopes toward the start of the climb.
Here we left the forest and the hiking trail.


The route begins at the base of the cliff behind a low ridge of rock that comes down from the col.
We needed to drop down below the ridge and hike up a short gully on the other side.
We found a trail heading in that direction.
This sign points the way back to the west col hiking trail (into the forest) and to the “scree slope descent” (straight down hill). Although it’s not recommended, we used the first part of the scree slope descent to drop down and access our climb.

The Base of the Climb

This is where we were heading.
Note that the pitch one description on the TABVAR website says the climb starts left of the Y-shaped crack but it is actually on the right.
I decided to drop down the trail to a lone tree and then go up the gully to the first belay. It was easier than trying to traverse the steep, hard, gravelly slope. Dan cut across higher up.


The lone tree has an old sign.
In the background of this photo, you can see a climbers’ trail coming across the slopes near the base of the rock face.
From the tree, this is the view up the gully to the start of the climb.
The climb starts near where the gully turns to go left up into the shade.
If you zoom in, you will see the Y-shaped crack on the bottom of the slab.


Starting up the gully. The lone tree is behind me.
Here is the base of the climb. The first bolt is circled. We set up our belay at the base of the cliff below the bolt.

It took us almost 2 hours to reach the bottom of the climb. We took half an hour to sit, eat and then get geared up for the climbing. This put us half an hour ahead of our Time Budget.
The Climb
I was both nervous and excited to start climbing. I had climbed a route on Mt Yamnuska with a mountain guide a year or two before I met Dan. It was an amazing day on super fun rock in a fantastic setting.
When Dan and I started climbing together, we talked about doing some routes on Mt Yamnuska. Now, after years of driving past the mountain and looking over at the south face, talking about climbing there on our own, we were finally doing it.
It was Dan’s turn to lead first. The first two pitches were slab. It was fun climbing on prickly, somewhat featured slab. The photo below shows the start of the climb as well as the approximate area where the first pitch ends at two bolts.
The circled boulder is on the second pitch. It is visible from the ground so you can see where the second pitch goes before you start climbing.

First Pitch

Here Dan is at the top of the first pitch. I took this photo from near the bottom. The orange quickdraw on the left is attached to the first bolt.
Dan only placed one piece of gear on this pitch. There were a couple of bolts and not a lot of places for gear.
I am starting up the first pitch.

Second Pitch

It was my turn to lead on the second pitch. I stepped out left to a crack where I was able to place some gear. Then I followed the crack up and to the right.
In the photo, I am pointing to the bolt on the pitch. From there, I did a short rising traverse left to the big boulder. I then stood on top of the big boulder and moved up from there.
Dan took this photo looking up the second pitch at the big boulder from the top of the first pitch.


Partway up the second pitch. The big boulder is on the left edge of the photo. The red quickdraw is attached to the bolt.
Above the big boulder, the climbing eases and there are opportunities to place gear. Micro cams worked well for the small cracks.

Third Pitch

Looking up the third pitch. The first quickdraw is clipped to a bolt.
Further up the third pitch. This pitch had the hardest moves on the route as it goes right onto the crest of the rib. There were bolts to protect these moves and Dan felt very secure leading there.


This is me coming up the third pitch.
The route description on the TABVAR website suggests linking pitches 3 and 4. We decided not to link.
Instead, Dan used the single bolt belay at the top of the third pitch, backed up with a piece of gear, to build an anchor and bring me up.
He did not place any gear on the 3rd pitch. There were enough bolts.


This is the top of the 3rd pitch. We are standing on a small platform on top of a pillar.
This was probably the smallest, most awkward belay on the route.
The photo shows the amazing line the route takes up the western edge of the mighty Yam. The world opened up around us.
WARNING: There were some very loose sections on the top three pitches of this route. Dan found a couple of large toaster-sized rocks loose and ready to drop on his way up the third pitch. He managed to push them onto ledges and avoid dropping them. Every hold on this climb should be tested carefully before trusting your hands or feet to them.
Fourth Pitch
The fourth pitch had lots of fun movement and many opportunities to place gear. I took advantage and placed many pieces. Good practice.


So much practice placing gear.
I found the fourth pitch to be easier than the first three.
I did not take any photos of the belay at the top of the fourth pitch. It was easy to find – a large flat space with a shrub at the back and one bolt in the slab beside it. I built the anchor using the bolt and a sling around the base of the shrub.
Fifth Pitch
The fifth pitch was the easiest. Dan walked up a slope to a final step of rock and climbed a gully, placing a few pieces of gear. At the top, he found an old bolt and backed it up with some gear for an anchor. Sorry, no photos. The weather was changing and we wanted to be at the top before the rain started. We focused on finishing the climb.
Descent
From the top, we knew we had to traverse around to the north. We saw a good scramble path down a wide gully and back up to the cliff face. I took the photo below after scrambling down from the top of the fifth pitch. Dan was putting the rope away while I searched for a good path around to the north side.

From here, we scrambled up to a dark boulder and then moved above it to where the slab meets the upper cliff face. This photo is looking back at our scramble off the top of the route. We tried to stay on solid rock, avoiding the loose gravel as much as possible.


We walked along the top of the slab toward the back, north side.
The west col and the hiking trail are on the left side of the photo.
This is looking back at where the slab ends and the scree begins. We stopped on the slab and changed our shoes before heading down the scree to join the scramble trail.

On the west col below, a large group of hikers had stopped for a break. We walked down the scree slope toward them and started celebrating the successful climb.

From there, we followed the hiking trail into the forest and back to the parking lot.
Challenges & Screw Ups
This climb went very smoothly. We used the pitch descriptions from the TABVAR website and the information from Andy’s book to find the route and never got off track. We moved carefully over the loose sections and didn’t drop rocks on each other or pull off holds.
Transitions went smoothly after the first pitch. We got into a rhythm of passing gear from the second to the lead as soon as the second was secured (we alternated leads). Then we reviewed the next pitch together, picking out the best way to go up. We didn’t rush but we kept moving and didn’t waste time.
We averaged 36 minutes per pitch, significantly faster than our time budget of one hour per pitch. The walk off took less time than I budgeted and was more straightforward than I anticipated. Overall, we came in at just over 7 hours compared with my time budget of 10 hours for the day.
Final Thoughts
BBQ’d Rib was a good introductory route on Mount Yamnuska. The climbing was true to the grade. We felt the first three pitches were true 5.6, comparable to Mother’s Day on Cascade Mountain. The fourth and fifth pitches of BBQ’d Rib were a bit easier, perhaps 5.5 and 5.4, respectively.
There were good opportunities to place gear or there were bolts to clip where gear couldn’t be placed.
The day went well for us. We made good decisions, climbed well and avoided screw-ups.
We would like to get back on Mount Yamnuska soon. For our next climb there, we are considering Easy Street, another 5.6 with 5 pitches. Easy Street is on the daunting south face. When we climb it, I will post a Trip Report, and let you know how it compares with BBQ’d Rib.
If you would like to be notified when I post new Trip Reports, enter your email and hit “subscribe”.
Leave a Reply