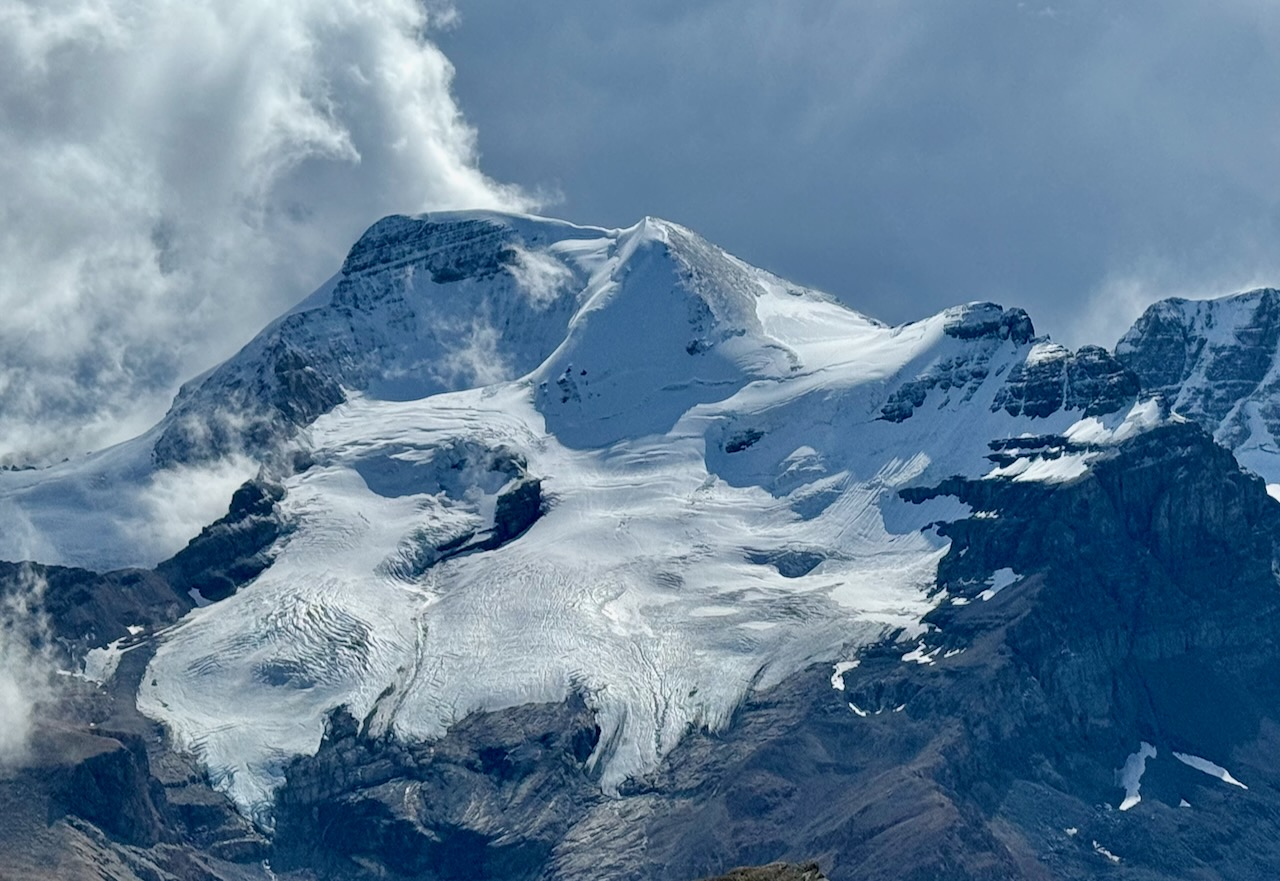
On September 5, 2026, Dan and I summited Mount Athabasca by the North Glacier route. This entire route can be seen from the Icefields Parkway below and when the sun is shining on it, with a deep blue sky behind, it’s hard to imagine a more beautiful mountain.
We had just finished a refresher course on snow and glacier safety with an awesome mountain guide from Yamnuska Mountain Adventures. We practiced those skills on this route with a PD rating (Peu Difficile – French for “not too tough”).
It was the first time Dan and I had successfully summited a glacier route and it felt so good to make it to the top. Even better, we felt like we’d done it well, mitigating risks and moving with confidence.
This route is primarily walking. There is no pitched climbing on rock or ice. It’s not steep enough to need belayed climbing. But the serious nature of the glacier travel and the steep snow slopes make it more challenging than any of the scrambles we’ve done. We were continuously aware that mistakes here can have severe consequences.
I had done this route almost 20 years earlier with Yamnuska Mountain Adventures as part of their Snow and Ice long weekend course. I also descended this route after climbing the Silverhorn route with Yamnuska in September, 2015. It was a very different challenge to do it with Dan, as two recreationalists, making all the decisions and managing all the risks ourselves.
The route has three main sections: 1 – hike up steep trail on moraine, 2 – ascend the glacier, and 3 – hike up and along the snowy summit ridge.
Beta Summary (details follow):
- Glacier, steep snow, PD
- Alpine start is recommended
- Gear: crampons, helmets, harnesses, rope, mountaineering ice axe, crevasse rescue gear
- Pro: there are no bolts or any other form of protection on this route
- Descent: reverse the ascent route
Planning
Dan and I asked Yamnuska Mountain Adventures to create a private program for us to build on our existing skills and brush up on our glacier travel and safety skills. Our program, based on their Snow and Ice Long Weekend course, was delivered by one of their amazing mountain guides – Nick Baggaley. Find out more about that course here.
We decided to climb this route while we were training with Mountain Guide Nick. As part of our training, we summitted nearby A2. When we hiked past Mount Athabasca, we asked Nick many questions about the route, the hazards and risk mitigation.
Resources
Guide Books that describe the route:
- Rockies West, The Climbers Guide to the Rocky Mountains of Canada by David P. Jones
- The 11,000er’s of the Canadian Rockies by Bill Corbett
Mount Athabasca is located within Jasper National Park and a Park Pass is required. Learn about buying a pass online here. You can also buy a pass when you drive into Jasper National Park or one of the adjoining national parks.
There are two campgrounds near the base of the mountain. One is the Columbia Icefield Campground, for tents only, and the other is Wilcox Creek Campground which can accommodate smallish RVs. Bigger RVs can overnight in a parking lot adjacent to the Icefields Information Centre.
Time Budget
When Dan and I are doing full day climbs, I like to estimate how much time each segment of the day will take us. Then I track our progress against the budget to see if it was realistic. This helps me know for the future how long it takes us to move over different terrain. Also, if things go sideways (for example, we get off route or delayed), I know if we will have enough time to complete our objective or if we’re better off to retreat.
The guidebook by David P. Jones, mentioned above, suggests 3 – 6 hours from the car to the summit. The 11,000er book estimates round trip time of 9 – 12 hours.
I hoped the route would be straightforward and not require much hunting around for which way to go. Many years before, when I had climbed it with mountain guides, I didn’t pay much attention to route choices. They sure made it seem easy!
I roughly estimated our times on the move as follows:
| SECTION | TIME |
|---|---|
| Moraine Hike | 2 hours |
| Glacier | 2 hours |
| Summit Ridge | 2 hours |
| Descent | 4 hours |
| TOTAL ESTIMATED MOVING TIME | 10 hours |
I wanted to be sure we had another hour or two for route finding, transitions and rest breaks so I planned for 12 hours.
We decided to start the route at 4:30 am. This pre-dawn start would get us to the glacier at first light, around 6:30 am. Then we woudl have plenty of time to get to the summit, descend and get back to the RV for dinner.
Parking
We turned off the Icefields Parkway onto the Snowcoach Road, opposite the Icefields Information Centre. We parked at the upper parking lot, where the private road for the Ice Tour buses leaves the public roads.
Moraine Hike
This section started on the asphalt that the Brewster (Ice Tour) Buses drive to bring tourists to the Ice Explorer machines that take them onto the glacier.
The morning of our climb was forecast to be cloudy but no rain or snow. Unfortunately, the clouds were at ground level.

The parking lot was very dark with all the mist.
Headlamps were mandatory. I don’t think I would have seen my hand in front of my face without one.
At the edge of the parking lot, a stand housed a Climber’s Log.


I signed us in, noting our start time and our route.
The air was so thick as we hiked the road, I found myself swatting the air in front of my face when I tried to look up and see the road ahead. The mist was so heavy it almost seemed I could reach out and push it away.
We hiked up the road in the darkness, forcing our way through the mist.
After about 1 km, a building emerged in front of us. It housed the Icefield Tour transportation machines. We paused to check it out.
The building is set in a large parking area where tour buses bring tourists to load onto the Ice Explorer machines.

We found our trail at the edge of the parking area, on the other side of a creek that comes down from the glacier between Boundary Peak and Mount Athabasca. It was a good thing we knew where to look. We had been there a few days before, with mountain guide Nick, on our way up A2.
We hiked up the steep bank and started up the moraine.

After about half an hour on the trail, we came to this rock which marks a fork in the trail. One trail heads left down to the creek. That was our route to A2.
This morning, we stayed right and continued up the moraine.
The trail continues mostly along the top of moraine ridges, sometimes very steeply. It goes up a hillside at one point, switchbacking on sometimes loose gravel.
Here we continued on a less steep section of the moraine trail. It had been many years since I was there and Dan had never been there before.
We knew to look for a bivy site – a flat area where a tent could be set up, surrounded by a wall of rocks that would shelter the tent from wind.

After about an hour and a half of hiking, we found the bivy sites (there were a few). It was still very dark. We put on our harnesses and loaded them with our bling (the carabiners, slings, cordellette and other gear we carried for glacier safety).

We then continued on the trail, looking for the start of the glacier where we would put on our crampons.
The sky was getting lighter but visibility was poor.
We hiked up over a large knoll.


And found the edge of the glacier.
Visibility was lousy. We couldn’t see much beyond our immediate surroundings.
We put on our crampons.
We stepped onto the ice here.
At this point, we had completed about a third of the total elevation gain to the summit and almost a quarter of the distance.
It was not yet 7:00 am and I felt like we were making good time.

And this is where we made a mistake. I like to think that if we had been able to see across the glacier, we would not have gone the wrong way.
The Glacier
The ice was steep where we stepped onto it. It was falling away sharply from the slopes above. We decided to move up to get onto a flatter section. We should have moved out, across the steep part. Had we been able to see further, we would have noticed that it flattened out after a few hundred meters.
The map below shows our route in blue as recorded on the GaiaGPS app on my phone. Our route starts at the top of the map.

The blue line splits on the glacier (light blue areas). On our way up, we went too high and ran into a bunch of crevasses. We decided to turn around and head across the glacier at a lower point.
The lower blue line, which shows our descent route, was way better. Much fewer crevasses and fairly flat, easy walking until the edge of the ice where it got steep.
When we started out on the glacier that morning, we should have crossed the steep slope instead of walking up it.

We found a lot of crevasses when we were too high on the glacier. Here Dan probes a crevasse, finding the edges so he can safely step over it.
The low clouds surrounding us made it difficult to know exactly where we were on the glacier.
There were a couple of cm’s of fresh snow. Not enough to obscure crevasses but we decided to rope up anyway. Abundance of caution.
When the clouds started to lift, we realized we were better off turning back and dropping down.


Soon we could see across to where we wanted to go. We aimed for the right side of the black rocky lump in the middle of the photo. From there we would be able to plan our path up the ramp, moving from left to right across the upper glacier.

As we got closer to the black lump, now on the left edge of the photo, the sky cleared and we were treated to sunshine.

A large crevasse cut across the glacier ahead. We would be forced to swing out left, going around the open, exposed area, and then cutting back right to begin our traverse above the crevasse.
This is the large crevasse we went around. We then moved along the slope above it.
Further ahead, we would have to swing out to the far right to get around the bergshrund above.
These zig-zags allowed us to cross the crevasse and bergshrund where they were narrow enough to step across.

While we traversed below the bergshrund and above this crevasse, I did not stop to take photos. It was an area exposed to avalanche from the slopes above and we moved as quickly and continuously as we could.

Above the bergshrund, we gained the col. Here it flattened out for a moment and we crossed a snow field.
We would have to figure out how to get to the top of the scree mound ahead and gain the summit ridge. There were no trails visible with the fresh snow and the scree looked horrendous.
The snow was ok for walking. It was about ankle deep and fairly supportive so we decided to climb snow as high as possible and look for a trail through the scree above.


Eventually, we found a trail and gladly followed its switchbacks to the top of the mound. This was the top of the Silverhorn Route.
From there it was less steep, rolling snow to the summit.

Not far to go. There are summit cairns on the rock just ahead. We did not drop down off the snow to look for a summit register. We were happy to stand on the snow bank and be above all the land around us.

Obligatory summit selfie.
When I was planning our day, I thought that noon should be our latest turn around time. We made the summit at 12:08. We did not linger. We snapped a few photos and turned around to begin the descent.

Now we had to retrace our steps. This photo shows the summit ridge, looking back to the top of the Silverhorn Route in the distance.
It was time to get moving before the sun heated up the slopes above the big crevasse too much. But I couldn’t resist snapping one more photo as we headed back along the summit ridge.

Far below, we could see the Icefields Parkway, the Information Centre and the parking lot where our van was waiting.

We were off the glacier at the bottom by 3:00 pm. The clouds had returned.
All that was left was to hike down the moraine.
This section shows where the trail drops down to follow the crest of the moraine ridge below. At the end of the ridge, it drops steeply to the Brewster Bus parking area.
There we saw many tourists crowded into the little building, waiting to board.
I felt triumphant as we walked down the road and back to our van.

It was such a thrill to complete this climb on our own. We felt that our decision making was good and we maintained our focus on mitigating risks.
Challenges & Screw Ups
I believe we managed to only make one error. We went too high when we first got on the glacier. It didn’t take too long for us to realize our mistake.
Once we knew we were in the wrong place, we did not hesitate to reverse our course and go back to where the ice was more solid. From there, we chose a better route.
It was especially important to stay low on our descent, when the warm sun was melting the snow on the slopes above and rocks could be released to fall onto the glacier below. We didn’t notice any rockfall when we were there but the number of loose rocks sitting on the glacier was evidence enough that this was a real hazard.

I did get frustrated at times by the route finding. I thought the route was going to be very straightforward but we had to make a lot of decisions about which way to go. I felt we were taking too much time on route finding but in the end, we completed the route in the 12 hours I had planned.
Final Thoughts
The North Glacier route has been on my list for many years. It’s an 11,000er and also a good introductory glacier route. For many people, it is their first glacier route.
It was super fun to drive back from our grocery shopping trip to Jasper the next day and be able to pick out some of our tracks up on the glacier. I took a photo from inside the van as we cruised back to the campground. If you zoom in on the glacier, you can pick out some of the tracks and see where we were. You can also see our tracks heading up from the col onto the slope that leads to the top of the Silverhorn.

The successful summit of Mount Athabasca marks the start of a new chapter of alpine climbing for me and Dan. We continue to practice the crevasse rescue skills we learned from Nick and plan to summit more glacier routes in 2027.
If you would like to be notified when I post new Trip Reports, enter your email and click “subscribe”.
Leave a Reply